Automatic migrations with Entity Framework 4.3
This blog post is a tutorial on configuring automatic schema-migrations using Entity Framework 4.3 in an ASP.NET MVC application (we'll do a post on doing the same with NHibernate soon). Having your application automatically update its database schema greatly eases development and makes frequent deployments to platforms like AppHarbor a cinch.
Why you want automatic migrations
At AppHarbor, we try to make deploying new versions of your code as fast and safe as possible. An important part of dependable application deployment procedures are safe and correct schema-migrations of any underlying datastore. If you are using a schema-less NoSQL datastore like RavenDB, CouchDB or MongoDB, this is probably not a big problem. If you're using a traditional SQL-based datastore like Microsoft SQL Server or MySQL, migrations are an important concern.
Because AppHarbor makes deployment relatively painless, you'll likely end up deploying more frequently than you're used to. Frequent deploys makes automated schema-management important. If it's a manual and error-prone chore, it will make pushing new versions of your code less attractive and this negates some of the advantages you get from running on AppHarbor. With dependable, automatic migrations in place, you can fearlessly push new versions of your code without worrying whether the underlying data-schema is in sync with your code.
When schema-updates should be triggered
We often get questions from users asking how they can incorporate schema-updates as part of AppHarbor building their code. Schema-migrations during builds is a bad idea, however. This is because your schema and code can get out of sync in a number of ways:
AppHarbor runs unit tests after the build and if any of the unit tests fail, the code is not deployed. You will then have an old version of your code running on the new database schema
Schema updates are not run if you roll back your application to a previous version of your code. If you roll back and the migration is not run, old code will be running with the newest version of the database schema
On AppHarbor there's is a lag between the build completing and the code getting deployed during which time running code and schema will be out of sync
A much better approach is to place the code someplace where you know it'll get called at least once before any other code in your app is executed when it's deployed anew. For ASP.NET MVC applications, Application_Start() is a good bet. Alternatively, if the check to see if the schema is up-to-date is fast or can be cached, running the update whenever you instantiate your repositories also works. In the tutorial below, we will use Entity Framework's OnModelCreating(DbModelBuilder modelBuilder) method to configure migrations.
Note that Application_Start() and any repository initilization might get called many times for any one deployed version of your app. On AppHarbor, for example, Application_Start() might get called multiple times if your application pool is recycled and started again or if your application is scaled to multiple web workers each starting up their own instance of your code. This makes it very important that your schema-updates are idempotent, i.e. implemented in such a way that running them multiple times won't cause trouble.
Entity Framework Code First
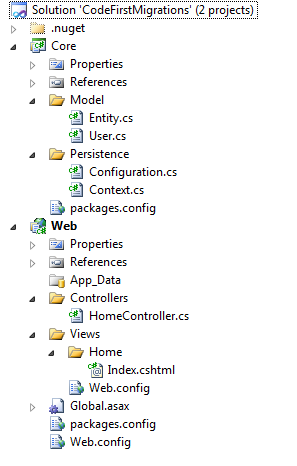
As mentioned in the introduction, the example we're building is an Entity Framework-backed ASP.NET MVC app. The application will be split into two projects, "Web", an ASP.NET MVC web site, and "Core", a class library. "Core" has all the interesting bits, the website is only included to demonstrate that the migrations are actually working. Here's a screenshot showing the finished solution in all it's simplicity.

The finished "Core" contains the following classes:
Entity.cs- base class for all model classes, hasIdproperty (required by Entity Framework)User.cs- lone model class (you can add more)Configuration.cs- where migration behaviour is configuredContext.cs- the context used to manipulate entities and where migrations are enabled
To start out, let's set up a standard Entity Framework Code First data store. First create the Core class library project and install Entity Framework from the NuGet package manager console:
install-package EntityFramework -ProjectName Core
Then add these classes:
Entity.cs:
namespace Core.Model
{
    public abstract class Entity
    {
        public int Id { get; set; }
    }
}
User.cs:
namespace Core.Model
{
    public class User : Entity
    {
        public string Name { get; set; }
    }
}
Context.cs:
using System.Data.Entity;
using Core.Model;

namespace Core.Persistence
{
    public class Context : DbContext
    {
        public DbSet<User> Users { get; set; }
    }
}
...and that's it for Core project for now. Go ahead and create the Web project (this tutorial uses Haack's Really Empty MVC 3 project template). For development storage, we'll be using SQL Server Compact and installing EntityFramework.SqlServerCompact gets us the necessary packages:
install-package EntityFramework.SqlServerCompact -ProjectName Web
Add a project reference to the Core project and add HomeController.cs:
using System.Web.Mvc;
using Core.Model;
using Core.Persistence;

namespace Web.Controllers
{
    public class HomeController : Controller
    {
        private readonly Context _context = new Context();

        public ActionResult Index()
        {
            return View(_context.Users);
        }

        public ActionResult Create(User user)
        {
            _context.Users.Add(user);
            _context.SaveChanges();

            return RedirectToAction("Index");
        }
    }
}
Add a Home directory in Views and an Index.cshtml view:
@model IEnumerable<Core.Model.User>

<h2>Index</h2>

<ul>
    @foreach (var user in Model)
    {
        <li>@user.Name</li>
    }
</ul>

@using(Html.BeginForm("Create", "Home", FormMethod.Post))
{
    <input type="text" name="Name" />
    <input type="submit" value="Submit" />
}
Now create an App_Data directory in the Web project for SQL Server CE to store its files and then configure the connection in Web.config:
<connectionStrings>
    <add name="context" connectionString="Data Source=|DataDirectory|data.sdf"
            providerName="System.Data.SqlServerCe.4.0" />
</connectionStrings>
Hitting F5 should result in a web form that you can use to add users to the database.
Automatic migrations
First, try changing the User model class by adding an additional property
namespace Core.Model
{
    public class User : Entity
    {
        public string Name { get; set; }
        public string EmailAddress { get; set; }
    }
}
And update the view accordingly:
@model IEnumerable<Core.Model.User>

<h2>Index</h2>

<ul>
    @foreach (var user in Model)
    {
        <li>@user.Name (@user.EmailAddress)</li>
    }
</ul>

@using(Html.BeginForm("Create", "Home", FormMethod.Post))
{
    <input type="text" name="Name" />
    <input type="text" name="EmailAddress" />
    <input type="submit" value="Submit" />
}
If you try to run the app now, Entity Framework will throw an exception stating that the model has changed and that you should be using migrations. In this tutorial we will use automatic migrations (if your application requires very elaborate migrations then Entity Framework also does code-based migrations). Configuring automatic migrations is extremly simple, just add a configuration class to the Core project:
using System.Data.Entity.Migrations;

namespace Core.Persistence
{
    public class Configuration : DbMigrationsConfiguration<Context>
    {
        public Configuration()
        {
            AutomaticMigrationsEnabled = true;
            AutomaticMigrationDataLossAllowed = true;
        }
    }
}
(AutomaticMigrationDataLossAllowed is optional. Without it, Entity Framework will throw an exception if it's about to do a migration that involves dropping columns or tables).
Finally add this OnModelCreating method to the Context class:
protected override void OnModelCreating(DbModelBuilder modelBuilder)
{
    Database.SetInitializer(new MigrateDatabaseToLatestVersion<Context, Configuration>());
}
That's it! Hit F5 and your app is in business with any previous data intact (less any dropped entities or columns) and the database schema automatically updated to reflect the new model.
Deploying to AppHarbor
The best thing is that all this deploys and works seamlessly on AppHarbor. The only thing lacking in the code is a Web.Release.config transform that changes the providerName attribute in the connectionstring from System.Data.SqlServerCe.4.0 to System.Data.SqlClient:
<?xml version="1.0"?>
<configuration xmlns:xdt="http://schemas.microsoft.com/XML-Document-Transform">
  <connectionStrings>
    <add xdt:Locator="Condition([@name='context'])" providerName="System.Data.SqlClient"
        xdt:Transform="SetAttributes" />
  </connectionStrings>
</configuration>
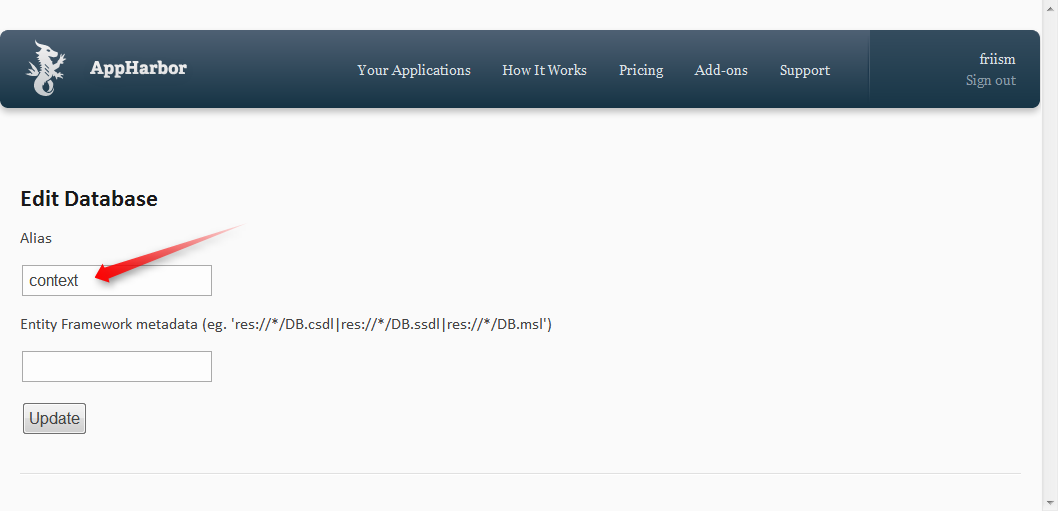
You also need add the SQL Server add-on to your application and set the alias to "context" (see screenshot below). This will make AppHarbor overwrite your SQL Server Compact Edition connectionstring with one that will work on AppHarbor.

Wrap up
So there you have it. Entity Framework Code First is delightfully simple to configure and use and with the migrations features released in 4.3, managing schemas while developing and deploying fast-changing apps is no longer a chore.
Full source code for this blog post is available here: https://github.com/friism/CodeFirstMigrations
