Ever-increasing requirements to application scalability and availability often requires applications to be deployed to multiple machines. Many cloud hosting providers, such as AppHarbor, even encourage developers to write apps that are mostly stateless and designed to scale horizontally.
This poses challenges when building applications that interacts with files: Files that are uploaded to a web service needs to be available to all instances that needs to serve them. This is difficult to archive if the files are written to the local file system of the instance that the file is uploaded to, which is also why we and other hosts restrict file system write access by default.
Amazon S3 and Google Cloud Storage supports CORS (Cross-origin resource sharing), which allows us to work with files in a flexible, asynchronous manner and provide our users with a better experience. In this post we'll show how to leverage CORS and the direct upload options available, and introduce a small new .NET library, Nupload, that makes working with GCS, S3, CORS and ASP.NET MVC even easier.
We'll walk through 5 steps to upload and serve files:
- Configuring CORS on S3 and GCS
- Server side form and signature generation.
- Asynchronous, CORS-enabled upload of files directly to S3 or GCS using Javascript.
- Notifying our application about successful uploads.
- Server side signing of URLs to serve private content to a client.
The source code is available on GitHub and includes a sample application - the sample application is also deployed to AppHarbor [so you can go and play with it right away. In this blog post we'll use the code in the sample application, but you can also just download the sample project and try it out for yourself. You'll need to set your own AWS or GCS credentials and configure the CORS policy of your bucket.
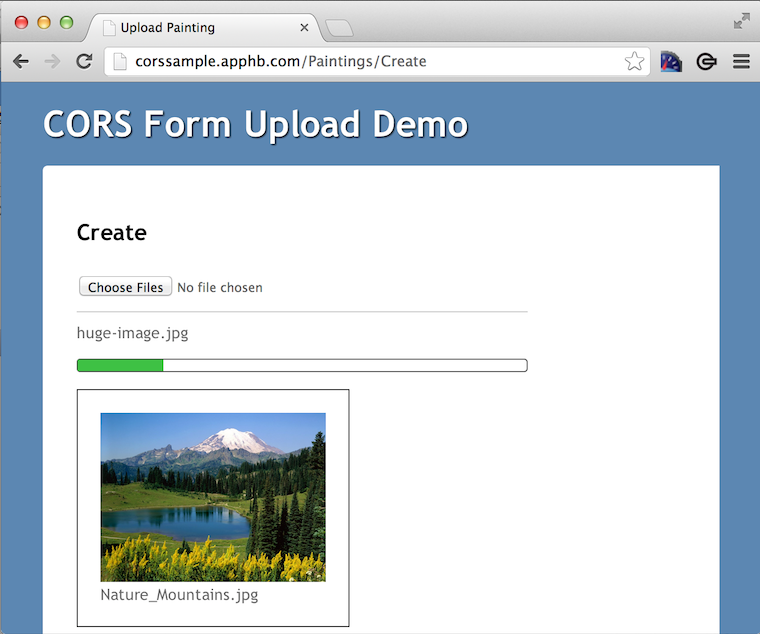
Before diving into the code lets walk through the configuration of CORS policies on AWS and GCS respectively.
Step 1: Configuring CORS policy
Below are a couple of samples for CORS configuration. Please note that in both cases you'd likely want to set the allowed origin parameters to something more restrictive than "*" - like the domain name of your application.
AWS configuration:
Go to the AWS S3 management console, create a bucket and click the "Add CORS configuration" button. The CORS configuration can look similar to this:
<?xml version="1.0" encoding="UTF-8"?>
<CORSConfiguration xmlns="http://s3.amazonaws.com/doc/2006-03-01/">
    <CORSRule>
        <AllowedOrigin>*</AllowedOrigin>
        <AllowedMethod>GET</AllowedMethod>
        <AllowedMethod>POST</AllowedMethod>
        <AllowedMethod>PUT</AllowedMethod>
        <MaxAgeSeconds>3000</MaxAgeSeconds>
        <AllowedHeader>*</AllowedHeader>
    </CORSRule>
</CORSConfiguration>
For security reasons we also recommend that you use AWS IAM to generate credentials that are only allowed to perform the bucket operations you need them for.
GCS configuration:
Use the gsutil tool to configure your bucket with a CORS configuration like so:
gsutil setcors corsconfig.xml gs://corssample
Where "corssample" is the name of your GCS bucket and corsconfig.xml contains something like:
<?xml version="1.0" encoding="UTF-8"?>
<CorsConfig>
    <Cors>
        <Origins>
            <Origin>*</Origin>
        </Origins>
        <Methods>
            <Method>GET</Method>
            <Method>HEAD</Method>
            <Method>POST</Method>
            <Method>DELETE</Method>
            <Method>PUT</Method>
        </Methods>
        <ResponseHeaders>
            <ResponseHeader>*</ResponseHeader>
        </ResponseHeaders>
        <MaxAgeSec>10</MaxAgeSec>
    </Cors>
</CorsConfig>
With this in place we're ready to upload files to our bucket using Nupload, ASP.NET MVC (2 or later supported out of the box) and CORS.
Step 2: Server side form and signature generation
S3 and GCS both work by POSTing files using a signature for authentication. The signature ensures that even though the clients have access to certain configuration fields, they won't be able to modify them. We need to do sign our signatures with private keys, so for security reasons this is best handled on the server side.
First we can install the Nupload library in our MVC web project. MVC2 and forward is supported out of the box, but it can easily be extended to other web application types. Nupload is available as a NuGet package which can easily be installed:
Install-Package Nupload
Using Nupload we can now configure the client uploads to our cloud storage provider like so:
public ActionResult Create()
{
    var randomStringGenerator = new RandomStringGenerator();
    var objectKey = string.Format("uploads/{0}/${{filename}}", randomStringGenerator.GenerateString(16));
    var bucket = "corssample";

    var maxFileSize = 512 * 1024 * 1024;
    var objectConfiguration = new AmazonS3ObjectConfiguration(objectKey, AmazonS3CannedAcl.Private, maxFileSize);

    var credentials = new AmazonCredentials(
                    ConfigurationManager.AppSettings.Get("amazon.access_key_id"),
                    ConfigurationManager.AppSettings.Get("amazon.secret_access_key"));

    var uploadConfiguration = new AmazonS3UploadConfiguration(credentials, bucket, objectConfiguration);

    return View(uploadConfiguration);
}
Here an AmazonS3UploadConfiguration object, which implement the IObjectConfiguration interface) is passed to the view. Object access settings are configured and can be set to any of the S3 Canned ACL grants.
If you prefer using GCS we've also included a GoogleCloudStorageUploadConfiguration implementation in Nupload, but you're free to add your own implementation to suit your requirements.
By using the upload configuration that is passed from the controller to our view, we can now implement the upload form in the "New" painting view:
@using Dupload

@using (Html.BeginAsyncUploadForm(new Uri(Url.Action("create"), UriKind.Relative), Model,
    new { id = "fileupload", data_as = "imageUrl" })) {

    <input id="file" multiple="multiple" name="file" type="file" />
}
The BeginAsyncUploadForm HtmlHelper extension method is included as part of the Nupload package. It takes care of extracting and writing all the required form attributes and fields based on our upload configuration. The first argument is the application's "callback URL", which will be set to the data-post attribute. The data_as attribute is also set for use later on.
This will render HTML similar to this:
<form accept-charset="utf-8" action="https://corssample.s3.amazonaws.com/" data-as="imageUrl" data-post="/Paintings/create" enctype="multipart/form-data" id="fileupload" method="post">
    <input id="key" name="key" type="hidden" value="uploads/osqSbYGNNWJXH4Go/${filename}">
    <input id="acl" name="acl" type="hidden" value="private">
    <input id="policy" name="policy" type="hidden" value="eyJleHBpcmF0aW9uIjoiMjAxabY0xMi0xMVQwMjo0MDo0NVoq$LCJjb25kaXRpb25zIjpbWyJzdGFydHMtd2l0aCIsIiRrZXkiLCIiXSxbInN0YXJ0cy121XRoIiwiJGNvbnRlbnQtdHlwZSIsIiJdLFsic3RhcnRzLXdpdGgiLCIkYWNsIiwicHJpdmF0ZSJdLFsiY29udGVudC1sZW5ndGgtcmFuZ2UiLDAsNTM2ODtwOTEyXSx7InN1Y2Nlc3NfYWN0aW9uX3N0YXR1cyI6IjIwMSa9LssiYnVja2V0IjoiY29yc3NhbXBsZSJ9LHsiYWNsIjoicHJpdmF0ZSJ9XX0=">
    <input id="signature" name="signature" type="hidden" value="P/cuc28kR4gc/sLeK1U7XS3gmGd4=">
    <input id="content-type" name="content-type" type="hidden" value="application/octet-stream">
    <input id="AWSAccessKeyId" name="AWSAccessKeyId" type="hidden" value="AKIAJMTMMPVNWB73LE4A">
    <input id="success_action_status" name="success_action_status" type="hidden" value="201">
    <input id="file" multiple="multiple" name="file" type="file">
</form>
We're now ready to implement the client side logic that'll upload files to our storage provider.
Step 3: Uploading files from the client
Files can be uploaded in a number of ways and in this example we'll use the jQuery FileUpload plugin. Here is some of the javascript included in the sample project:
$('#fileupload').fileupload({
    dataType: "xml",
    add: function (e, data) {
        var file, types;
        types = /(\.|\/)(gif|jpe?g|png)$/i;
        file = data.files[0];
        if (types.test(file.type) || types.test(file.name)) {
            data.context = $(tmpl("template-upload", file));
            $('#fileupload').append(data.context);
            data.form.find('#content-type').val(file.type);

            return data.submit();
        } else {
            return alert("" + file.name + " is not a gif, jpeg, or png image file");
        }
    },
    done: function (e, data) {
        var content, domain, file, path, to;
        file = data.files[0];
        to = $('#fileupload').data('post');
        content = {};

        var location = $(data.result).find("Location")[0].textContent;
        content[$('#fileupload').data('as')] = decodeURIComponent(location);
        $.post(to, content, function (data, statusText, xhr) {
            $.get(xhr.getResponseHeader("location"), function (painting) {
                $("#uploadedPaintings").append($(tmpl("template-painting", painting)));
            });
        });
        if (data.context) {
            return data.context.remove();
        }
    },
});
Let's go through some of the steps:
- When files are added the "add" callback is invoked. In this case we're testing the file ending, but you can of course put any validation logic you like here.
- If the file type is valid we set the "content-type" form field to the actual mime type of the file. By default the content-type field is set to
application/octet-stream, but we want to set the specific content type so the cloud storage provider can use it for serving content.
- Finally the form is submitted and the upload is initiated.
Step 4: Notifying our application about the uploaded files
When the files have been uploaded we want to notify our application about it. That is also handled by the javascript above:
- The
done callback is invoked when the upload finishes. At this point we use the response from our storage provider to get the exact file URL. We then POST a request to the data-post (callback) URL. The parameter name for the object URL is set to the value of the data-as attribute, in this case "imageUrl".
- Finally a javascript template is rendered to show the user the new file.
The controller action that takes this request could look similar to this (assuming the Painting model has an ImageUrl parameter):
[HttpPost]
public ActionResult Create(Painting painting)
{
    if (ModelState.IsValid)
    {
        var imageUri = new Uri(painting.ImageUrl);
        painting.Name = Server.UrlDecode(imageUri.Segments.Last());

        _databaseContext.Paintings.Add(painting);
        _databaseContext.SaveChanges();

        Response.RedirectLocation = Url.Action("details", new { id = painting.Id });
        return new HttpStatusCodeResult((int)HttpStatusCode.Created);
    }

    return View(painting);
}
We simply set the URL decoded name of the Painting object, save it to the database and redirect the client to the "Details" action.
Our application now knows about the new Painting that was uploaded, and it can be served directly from the cloud storage provider by specifying the image url. In case you want to modify files (like creating thumbnails) we recommend that you do this asynchronously, for instance by using AppHarbor's background workers.
Step 5: Authorizing file downloads
In a lot of cases we don't want files to be publicly accessible. We want to restrict access only to authorized users. As you may have noticed we actually set the access grant to "Private" in step 2, which means that only the bucket owner has access to the file. This also means that although a client can upload files like we saw in step 3, he cannot retrieve it afterwards even with the URL. This gives us much of the same access control that we'd have if we stored the files locally.
We can authorize access to private files in our bucket by using signed URLs. Signed URLs allows us to give our clients a URL with a signature parameter, which authorizes access to the resource given a signature expiration and a method. We've included "URL signers" for AWS and GCS in Dupload, which can be used like so:
public ActionResult Details(int id)
{
    var painting = _databaseContext.Paintings.Find(id);

    var credentials = new AmazonCredentials(
                    ConfigurationManager.AppSettings.Get("amazon.access_key_id"),
                    ConfigurationManager.AppSettings.Get("amazon.secret_access_key"));
    var urlSigner = new AmazonS3UrlSigner(credentials);
    var signedUrl = urlSigner.GetSignedUrl(new Uri(painting.ImageUrl), TimeSpan.FromMinutes(20));

    return Json(new
    {
        id = painting.Id,
        signedUrl = signedUrl,
        name = painting.Name
    },
    JsonRequestBehavior.AllowGet);
}
This will give us a signed URL, which will be valid for 20 minutes which should be plenty of time to retrieve an image.
In the example application we use the returned JSON object from the Details action to render our template. The template can look like so:
<script id="template-painting" type="text/x-tmpl">
    <div class="painting">
        <img src="{%=o.signedUrl %}" alt="{%=o.name %}">
        <span>{%= o.name %}</span>
    </div>
</script>
That's it. The application can now handle uploads to Amazon S3 using CORS, notify our application about the new file upload and afterwards serve it using a signed URL.
We hope you'll find good use of the Nupload library and please feel free to contribute with anything you think is missing. We can also recommend watching this railscasts episode if you'd like to learn more about uploading to Amazon S3.


